To set Armadillo as a Wireless access point, we need to create a Virtual Access Point in Armadillo.
There are some tools to make a Virtual Access Point on a linux system like Armadillo, but today we implement
hostapd and dnsmasq.
1.SET UP HOSTAPD
hostapd (host access point daemon) is a user space daemon software enabling a network interface card
to act as an access point and authentication server.
Install hostapd
[armadillo ~]# apt-get update
[armadillo ~]# apt-get install hostapd
The /etc/hostapd/hostapd.conf is the main configuration which you need to deal with in order to set up a software
enabled access point (SoftAP).
The following simplified configuration which let you test if hostapd is working or not.
Create file ~/hostapd_test.conf with the following contents:
[armadillo ~]# vi hostapd_test.conf
#change wlan0 to your wireless device
interface=wlan0
driver=nl80211
ssid=atmark-test
channel=10
#
Start the hostapd:
[armadillo ~]# hostapd ~/hostapd_test.conf
Don’t stop launching by Ctrl+c until finishing testing.
Use any device with WiFi capabilities like smartphone to check if the Access Point is working properly,
but at this time you won’t able to connect to it.
Once the connection is working fine, it is time to configure it with more options.
This is the brief overview of some of its options:
[armadillo ~]# vi /etc/hostapd/hostapd.conf
interface=wlan0    ❶
driver=nl80211    ❷
ssid=atmark-test❸
hw_mode=g ❹
channel=10 ❺
ieee80211n=1 ❻
wpa=2 ❼
wpa_passphrase=atmark32 ❽
wpa_key_mgmt=WPA-PSK ❾
rsn_pairwise=CCMP ❿
❶network interface
❷driver interface type
❸AP ESSID
❹operation mode (2.4GHz)
❺pick up channel 10(1-13 channel usage)
❻“1”=Enable IEE802.11n, “0”=Disable
❼"1"=wpa only, "2"=wpa2 only, "3"=both
❽AP password
❾key management algorithm
❿standard encryption protocol
Activate hostapd starting at boot time, by doing the following.
edit /etc/default/hostapd:
DAEMON_CONF="/etc/hostapd/hostapd.conf"
Enable the hostapd at the boot time with command:
[armadillo ~]# update-rc.d hostapd enable
Next you need to set up DHCP server to assign IP address of devices connecting to Access Point.
2.SET UP DHCP SERVER
To set up a DHCP server you can use the DHCP server package which was formerly known as dhcp3-server.
[armadillo ~]# apt-get update
[armadillo ~]# apt-get install isc-dhcp-server
Or
You can do it the easier way with dnsmasq:
Install dnsmasq
[armadillo ~]# apt-get update
[armadillo ~]# apt-get install dnsmasq
In this part, i want to guide you do it by dnsmasq.
The default /etc/dnsmasq.conf explains all its configuration options pretty well,
so you might jump straight to what a simple
/etc/dnsmasq.conf:
<>
…
#Interface to blind to
interface=wlan0
…
#Specify starting range, end range, lease time
dhcp-range=172.16.57.2, 172.16.57.10, 12h
Attention: Using your correct IP range (2: my 1st pool ip, 10: my last pool ip)
Restart DNSMasq to apply the setting:
[armadillo ~]# /etc/init.d/dnsmasq restart
To assign static IP address based on a device’s MAC address,
edit the file /etc/dmsmasq.conf and add the following line for each device (using the correct MAC:IP address):
dhcp-host=24:0A:C4:08:F8:EC, 172.16.57.5
Start DNSMasq then clients are able to connect to AP:
[armadillo ~]# ip link set wlan0 down
[armadillo ~]# ip addr flush dev wlan0
[armadillo ~]# ip link set wlan0 up
[armadillo ~]# ip addr add 172.16.57.1/24 dev wlan0
To check IP address of wlan0:
[armadillo ~]# ip addr show dev wlan0
It should look like:
10: wlan0: <BROADCAST,MULTICAST,UP,LOWER_UP> mtu 1500 qdisc mq state UP group default qlen 1000
    link/ether 44:c3:06:30:c3:59 brd ff:ff:ff:ff:ff:ff
    inet 172.16.57.1/24 scope global wlan0
       valid_lft forever preferred_lft forever
    inet6 fe80::46c3:6ff:fe30:c359/64 scope link
       valid_lft forever preferred_lft forever
Here is the command to start Access Point:
[armadillo ~]# service hostapd start
And stop it:
[armadillo ~]# service hostapd stop
3.START UP CONNECTION
You are probably successful in building Armadillo as a "WiFi Modem" finally and now in this part,
we will try making a connection to this AP with a small combo wireless module
which has been animated by IoTer recently: ESP32.
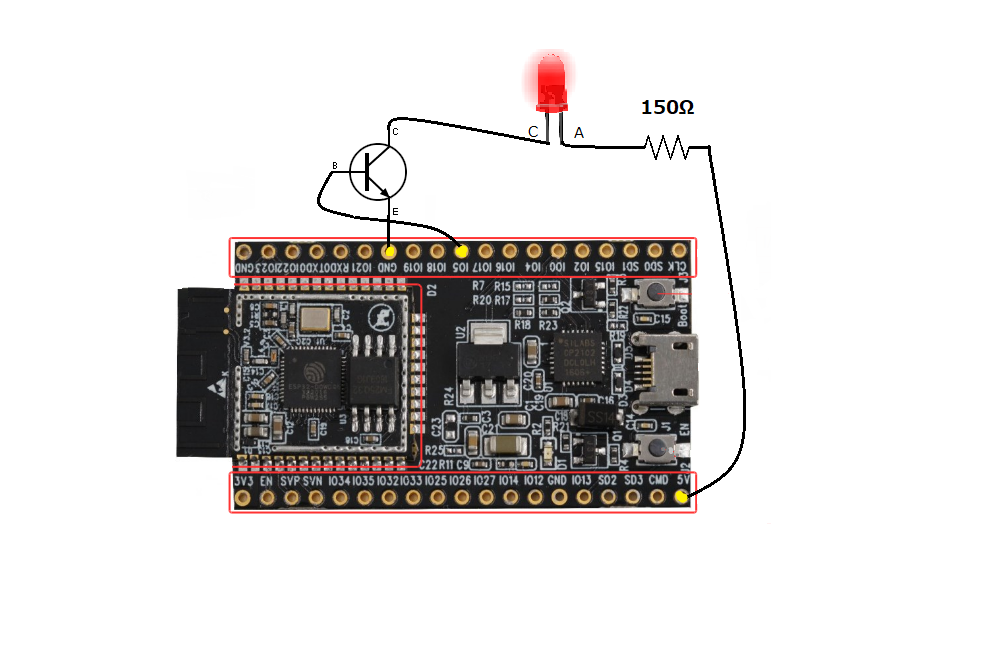
Start with a simple example: toggle GPIO to turn ON/OFF LED.
Connect up your circuit like the following(using your test board):

then power it up by pluging micro-USB port.
We prepared our own binary firmware to test the WiFi connection.
Click esp32 firmware to download the file.
To flash this firmware to your esp32, please refer to write binary data to flash.
Attention: This firmware is set to connect my station to Access Point with
SSID:dotest32
password:atmark32
therefore please set your AP with the same SSID and password.
To show device list connecting to Armadillo:
[armadillo ~]# arp -a -i wlan0
It might take several minutes, here is list of three connecting devices:
?(172.16.57.5) at 24:0a:c4:08:f8:ec [ether] on wlan0
?(172.16.57.3) at a0:28:ed:81:22:f0 [ether] on wlan0
?(172.16.57.9) at 20:91:48:c9:b7:64 [ether] on wlan0
To control GPIO of ESP32, using curl and POST to send a HTTP request like the following format:
[armadillo ~]# curl -d '{"LEDstatus":x}' -H "Content-Type: application/json" -X POST 172.16.57.3/
| {"LEDstatus":x} | JSON format with x=1: LED ON, x=0: LED OFF |
| 172.16.57.3 | Station IP Address |
The response to your AP should look like:
200 OK
LED status: ON
Or
200 OK
LED status: OFF
If the response here: 400 Bad Request, 404 Not Found, curl: (7) Failed to connect to 172.16.57.x port 80: No route to host.
Please check your format and parameters again.
Meanwhile, you should check the serial output of ESP32 by connecting the micro-USB port to PC Serial Terminal,
it should look like:
Serial port:
Connecting...
Connecting...
Connected
* Host Info:
** SSID: dotest32
** RSSI: -14 (dBm)
** Channel: 10
* Client Info:
** MAC Address: 24:0A:C4:08:F8:EC
** IP Address: 172.16.57.3
4.CONCLUSION
In this tutorial, we are just only guiding you how to create a connection to a AP like an hostpot.
But you can make more complex and sophisticated your project by building a "bridge connection" to your wired network
or mobile network as well.