Armadillo-IoT G4 で AWS IoT Greengrass V2 を使用した Pub/Sub AWS IoT Core MQTT メッセージの確認方法について説明します。
本 Howto の構成は以下です。
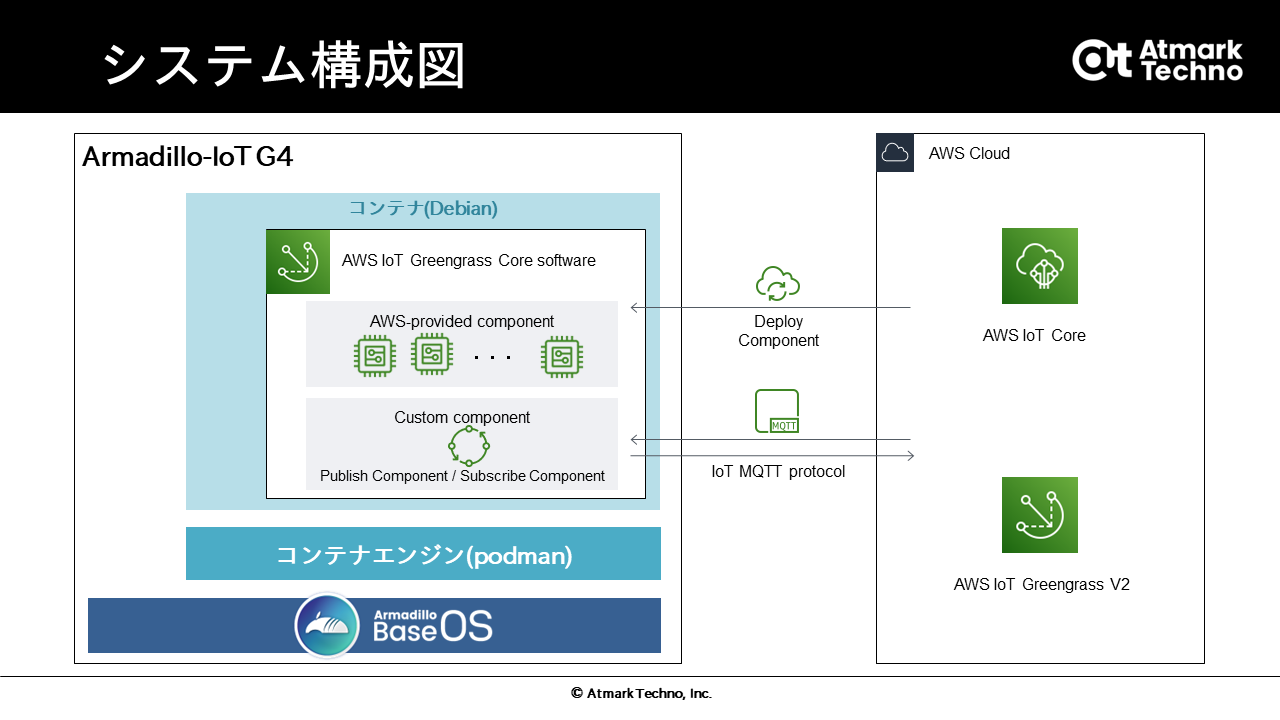
システム構成
以下にシステム構成図を示します。
前回は lambda 関数に対して Publish のみ確認しましたが、今回はカスタムコンポーネントを作成し Publish / Subscribe 両方について確認します。今回のカスタムコンポーネントは Publish/Subscribe に AWS IoT Core MQTT メッセージを使用します。
AWS IoT Core MQTT メッセージとは
AWS IoT Core MQTT メッセージは、AWS IoT Core が使用するデバイス通信プロトコルの一つです。詳細は、MQTTやMQTT トピックをご確認ください。本 Howto では AWS IoT Core MQTT メッセージを使用して Pub/Sub コンポーネントの動作確認を行います。
Pub/Sub AWS IoT Core MQTT メッセージの動作確認
Pub/Sub AWS IoT Core MQTT メッセージの動作確認についてはパブリッシュ/サブスクライブAWS IoT CoreMQTT メッセージを参考に Publish コンポーネントと Subscribe コンポーネントを作成し、動作確認を行います。
Publish コンポ―ネントの作成と確認
最初に Publish コンポーネントの動作確認を行います。パブリッシュ/サブスクライブAWS IoT CoreMQTT メッセージを参考に Publish コンポーネントを作成します。
1. Publish コンポ―ネントの作成
以下のコンポーネントを作成します。
- コンポーネント名: "com.example.Publisher"
- バージョン: "1.0.0"
2. Amazon S3 へのアーティファクトのアップロード
カスタムコンポーネントの作成とデプロイ を参考に Amazon S3 へアーティファクトをアップロードします。今回は例として "<S3 バケット名 >/artifacts/com.example.Publisher/1.0.0/pub.py" に配置します。以下はトピック名 "my/topic" に対して、json メッセージを発行するサンプルプログラムになります。
import json
import awsiot.greengrasscoreipc
import awsiot.greengrasscoreipc.client as client
from awsiot.greengrasscoreipc.model import (
    QOS,
    PublishToIoTCoreRequest
)

TIMEOUT = 10

ipc_client = awsiot.greengrasscoreipc.connect()

topic = "my/topic"
message = { "message": "Hello, World" }
message = json.dumps(message).encode('utf-8')
qos = QOS.AT_LEAST_ONCE

request = PublishToIoTCoreRequest()
request.topic_name = topic
request.payload = message
request.qos = qos
operation = ipc_client.new_publish_to_iot_core()
operation.activate(request)
future = operation.get_response()
future.result(TIMEOUT)
3. AWS IoT Greengrass にコンポーネント作成
カスタムコンポーネントの作成とデプロイ を参考に以下の json 記述のレシピを用いてコンポーネントを作成します。今回は例として 2 で配置した "<S3 バケット名 >/artifacts/com.example.Publisher/1.0.0/pub.py" を指定します。
{
  "RecipeFormatVersion": "2020-01-25",
  "ComponentName": "com.example.Publisher",
  "ComponentVersion": "1.0.0",
  "ComponentDescription": "A component that publishes messages.",
  "ComponentPublisher": "Amazon",
  "ComponentConfiguration": {
    "DefaultConfiguration": {
      "accessControl": {
        "aws.greengrass.ipc.mqttproxy": {
          "com.example.Publisher:mqttproxy:1": {
            "policyDescription": "Allows access to publish/subscribe to all topics.",
            "operations": [
              "aws.greengrass#PublishToIoTCore"
            ],
            "resources": [
              "my/topic"
            ]
          }
        }
      }
    }
  },
  "Manifests": [
    {
      "Platform": {
        "os": "linux"
      },
      "Lifecycle": {
        "Install": "pip3 install awsiotsdk",
        "Run": "python3 -u {artifacts:path}/pub.py"
      },
    "Artifacts": [
            {
                  "URI": "s3://<S3 バケット名>/artifacts/com.example.Publisher/1.0.0/pub.py",
                  "Unarchive": "NONE"
            }
      ]
    }
  ]
}
4. AWS IoT Core console からの確認準備
デプロイされた直後に Publish コンポーネントが動くため、あらかじめ確認準備を行います。AWS IoT Core console を用いて動作確認を行います。AWS IoT Core console の "テスト" 内の "MQTT テストクライアント" を選択します。タブで "トピックをサブスクライブする" を選び、トピックのフィルターにトピック名 "my/topic" を入力し "サブスクライブ" ボタンを押して追加します。
5. AWS IoT Greengrassからのコンポーネントのデプロイ
カスタムコンポーネントの作成とデプロイを参考にコアデバイスにコンポーネントをデプロイします。
6. デプロイの確認
コンポーネントの一覧の中にコンポーネント名 "com.example.Publisher" が見つかればデプロイに成功しています。
7. Publish コンポ―ネントの動作確認
4 で設定した AWS IoT Core console の "テスト" 内の "MQTT テストクライアント" を確認します。以下のメッセージが確認できれば受信成功です。
{ "message": "Hello, World" }
Subscribe コンポ―ネントの作成と確認
次に Subscribe コンポーネントの動作確認を行います。パブリッシュ/サブスクライブAWS IoT CoreMQTT メッセージを参考に Subscribe コンポーネントを作成します。
1. Subscribe コンポ―ネントの作成
以下のコンポーネントを作成します。
- コンポーネント名: "com.example.Subscriber"
- バージョン: "1.0.0"
2. Amazon S3 へのアーティファクトのアップロード
カスタムコンポーネントの作成とデプロイ を参考に Amazon S3 へアーティファクトをアップロードします。今回は例として "<S3 バケット名 >/artifacts/com.example.Subscriber/1.0.0/sub.py" に配置します。以下はトピック名 "my/topic" を受信してメッセージ内容をログに表示するサンプルプログラムになります。
import time
import traceback

import awsiot.greengrasscoreipc
import awsiot.greengrasscoreipc.client as client
from awsiot.greengrasscoreipc.model import (
    IoTCoreMessage,
    QOS,
    SubscribeToIoTCoreRequest
)

TIMEOUT = 10

ipc_client = awsiot.greengrasscoreipc.connect()

class StreamHandler(client.SubscribeToIoTCoreStreamHandler):
    def __init__(self):
        super().__init__()

    def on_stream_event(self, event: IoTCoreMessage) -> None:
        try:
            message = str(event.message.payload, "utf-8")
            # Handle message.
            print("payload: {0}".format(message))
        except:
            traceback.print_exc()

    def on_stream_error(self, error: Exception) -> bool:
        # Handle error.
        return True  # Return True to close stream, False to keep stream open.

    def on_stream_closed(self) -> None:
        # Handle close.
        pass

topic = "my/topic"
qos = QOS.AT_MOST_ONCE

request = SubscribeToIoTCoreRequest()
request.topic_name = topic
request.qos = qos
handler = StreamHandler()
operation = ipc_client.new_subscribe_to_iot_core(handler)
future = operation.activate(request)
future.result(TIMEOUT)

# Keep the main thread alive, or the process will exit.
while True:
    time.sleep(10)

# To stop subscribing, close the operation stream.
operation.close()
3. AWS IoT Greengrass にコンポーネント作成
カスタムコンポーネントの作成とデプロイ を参考に以下の json 記述のレシピを用いてコンポーネントを作成します。今回は例として 2 で配置した "<S3 バケット名 >/artifacts/com.example.Subscriber/1.0.0/sub.py" を指定します。
{
  "RecipeFormatVersion": "2020-01-25",
  "ComponentName": "com.example.Subscriber",
  "ComponentVersion": "1.0.0",
  "ComponentDescription": "A component that subscribes messages.",
  "ComponentPublisher": "Amazon",
  "ComponentConfiguration": {
    "DefaultConfiguration": {
      "accessControl": {
        "aws.greengrass.ipc.mqttproxy": {
          "com.example.Subscriber:mqttproxy:1": {
            "policyDescription": "Allows access to publish/subscribe to all topics.",
            "operations": [
              "aws.greengrass#SubscribeToIoTCore"
            ],
            "resources": [
              "my/topic"
            ]
          }
        }
      }
    }
  },
  "Manifests": [
    {
      "Platform": {
        "os": "linux"
      },
      "Lifecycle": {
        "Install": "pip3 install awsiotsdk",
        "Run": "python3 -u {artifacts:path}/sub.py"
      },
    "Artifacts": [
            {
                  "URI": "s3://<S3 バケット名>/artifacts/com.example.Subscriber/1.0.0/sub.py",
                  "Unarchive": "NONE"
            }
      ]
    }
  ]
}
4. IoT AWS Greengrassからのコンポーネントのデプロイ
カスタムコンポーネントの作成とデプロイ を参考にコアデバイスにコンポーネントをデプロイします。
5. デプロイの確認
コンポーネントの一覧の中にコンポーネント名 "com.example.Subscriber" が見つかればデプロイに成功しています。
6. Subscribe コンポ―ネントの動作確認
AWS IoT Core console を用いて動作確認を行います。AWS IoT Core console の "テスト" 内の "MQTT テストクライアント" を選択します。タブで "トピックに公開する" を選びます。以下のように内容を設定します。
- トピック名: my/topic
- メッセージペイロード
{ "message": "hello!" }
上記設定後 "発行" を選択します。Subscribe コンポーネントが動作しているかコンテナ上でログを確認します。
[container ~]# sudo tail -f /greengrass/v2/logs/com.example.Subscriber.log
以下のようなログが確認できれば、動作確認は終了です。
2021-12-23T06:25:54.933Z [INFO] (Copier) com.example.Subscriber: stdout. payload: {. {scriptName=services.com.example.Subscriber.lifecycle.Run, serviceName=com.example.Subscriber, currentState=RUNNING}
2021-12-23T06:25:54.934Z [INFO] (Copier) com.example.Subscriber: stdout. "message": "hello!". {scriptName=services.com.example.Subscriber.lifecycle.Run, serviceName=com.example.Subscriber, currentState=RUNNING}
2021-12-23T06:25:54.934Z [INFO] (Copier) com.example.Subscriber: stdout. }. {scriptName=services.com.example.Subscriber.lifecycle.Run, serviceName=com.example.Subscriber, currentState=RUNNING}
"MQTTテストクライアント" で発行したメッセージを確認できたので、受信も問題ないことがわかります。
以上で、Armadillo-IoT G4 で AWS IoT Greengrass V2 を使用した Pub/Sub AWS IoT Core MQTT メッセージの確認方法についての説明を終了します。