Armadillo-640のインストール方法(※)に関連する手順をまとめました。
※)
Armadillo-640 製品マニュアル:11.1. インストールディスクを使用する
1. インストールディスクの準備
TIPS:Windows上でArmadilloのインストールディスクイメージをSD/microSDカードに書き込むを参考に
Armadillo-640のインストールディスクイメージ(※)を書き込んだmicroSDカードを準備しておきます。
※)下記の標準のインストールディスクイメージ、または、独自で作成したインストールディスクイメージ
Armadillo-640 インストールディスクイメージ(Debianインストール用)
Armadillo Base OS対応 Armadillo-640 インストールディスクイメージ
2. PCとArmadillo-640の接続
Armadillo-640:コンソール接続方法(抜粋版)を参考に、PCとArmadillo-640を接続します。
3. ジャンパー、スイッチ、SDカードのセッティング
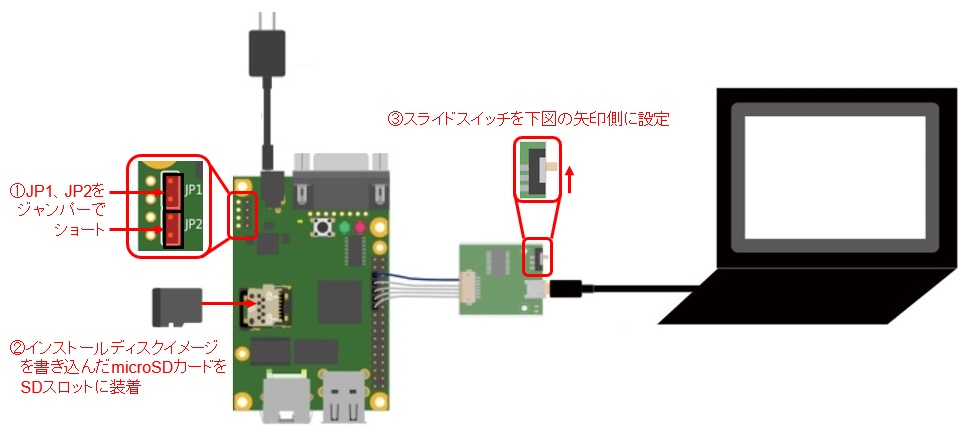
Armadillo-640の電源を落とした状態で、下図の①②③をセッティングします。

4. コンソールの準備
TIPS:ArmadilloのコンソールにTera Termを使用を参考に、
Armadillo-640のコンソールとして、PCにシリアル通信ソフトを起動しておきます。
5. インストールの実行
以下、インストールするOS(Debian/Armadillo Base OS)別に説明します。
Debianの場合
Armadillo-640に電源を投入すると、起動ログが表示されます。
U-Boot 2018.03-at8 installer+ (Feb 17 2020 - 19:19:21 +0900)

CPU:   Freescale i.MX6ULL rev1.0 at 396 MHz
Reset cause: POR
I2C:   ready
DRAM:  512 MiB
MMC:   FSL_SDHC: 0, FSL_SDHC: 1
In:    serial
Out:   serial
Err:   serial
PMIC: PFUZE3000 DEV_ID=0x30 REV_ID=0x11
Net:   FEC
=>
コマンド待ちの状態になっているので、bootコマンドを実行します。
=> boot
インストールが開始されます。
実行中は下記のようにログが出力されます。
=> boot
6601520 bytes read in 388 ms (16.2 MiB/s)
28077 bytes read in 56 ms (489.3 KiB/s)
## Booting kernel from Legacy Image at 82000000 ...
   Image Name:   Linux-4.14-at19
   Image Type:   ARM Linux Kernel Image (uncompressed)
   Data Size:    6601456 Bytes = 6.3 MiB
   Load Address: 82000000
   Entry Point:  82000000
   Verifying Checksum ... OK
## Flattened Device Tree blob at 83000000
   Booting using the fdt blob at 0x83000000
   Loading Kernel Image ... OK
   Loading Device Tree to 9eef9000, end 9ef02dac ... OK

Starting kernel ...

(略)

=== Step.4 sync ===

Write Protect Groups 0-0 (Blocks 0-16383), Temporary Write Protection
*+*+* Install Completed!! *+*+*
上記のように"Install Completed"が表示されるとインストール完了です。
Armadillo-640の電源を落として、上図のJP1、JP2のジャンパーとmicroSDカードを外してください。
以後、Armadillo-640の電源を投入すると、Debianで起動します。
Armadillo Base OSの場合
Armadillo-640に電源を投入すると、起動ログが表示されます。
U-Boot 2020.04-at20 (Oct 24 2023 - 04:16:30 +0000)

CPU:   i.MX6ULL rev1.0 at 396 MHz
Model: Atmark Techno Armadillo-600 Series
DRAM:  512 MiB
setup_rtc_disarm_alarm: Can't find bus
WDT:   Started with servicing (10s timeout)
PMIC: PFUZE3000 DEV_ID=0x30 REV_ID=0x11
MMC:   FSL_SDHC: 0, FSL_SDHC: 1
Loading Environment from MMC... OK
In:    mxc_serial
Out:   mxc_serial
Err:   mxc_serial
switch to partitions #0, OK
mmc1 is current device
flash target is MMC:1
Net:
Warning: ethernet@2188000 using MAC address from ROM
eth0: ethernet@2188000
Fastboot: Normal
Normal Boot
=>
コマンド待ちの状態になっているので、bootコマンドを実行します。
=> boot
インストールが開始されます。
実行中は下記のようにログが出力されます。
=> boot
switch to partitions #0, OK
mmc1 is current device
Cannot lookup file boot/boot.scr
6367416 bytes read in 1394 ms (4.4 MiB/s)
Booting from mmc ...
38353 bytes read in 66 ms (567.4 KiB/s)
Loading fdt boot/armadillo-640.dtb
Cannot lookup file boot/overlays.txt
## Booting kernel from Legacy Image at 80800000 ...
   Image Name:   Linux-5.10.210-0-at
   Created:      2024-02-26   4:05:39 UTC
   Image Type:   ARM Linux Kernel Image (uncompressed)
   Data Size:    6367352 Bytes = 6.1 MiB
   Load Address: 82000000
   Entry Point:  82000000
   Verifying Checksum ... OK
## Flattened Device Tree blob at 83500000
   Booting using the fdt blob at 0x83500000
   Loading Kernel Image
   Loading Device Tree to 9ef1c000, end 9ef48fff ... OK

Starting kernel ...


Starting image installer script

Writing rootfs image... ok
Writing boot loader... ok
Preparing app partition... ok
Finishing installation...
Device not supported.
Finished writing mmc. powering off now
[   45.447170] imx2-wdt 20bc000.watchdog: Device shutdown: Expect reboot!
[   45.454199] reboot: Power down
上記のように"reboot: Power down"が表示されるとインストール完了です。
Armadillo-640の電源を落として、上図のJP1、JP2のジャンパーとmicroSDカードを外してください。
以後、Armadillo-640の電源を投入すると、Armadillo Base OSで起動します。