以下の記事のシステムのアプリケーション開発について案内いたします。
Armadillo-IoT A6E:省電力カメラシステム(コンセプト・ハードウェア選定編)
アプリケーション概要

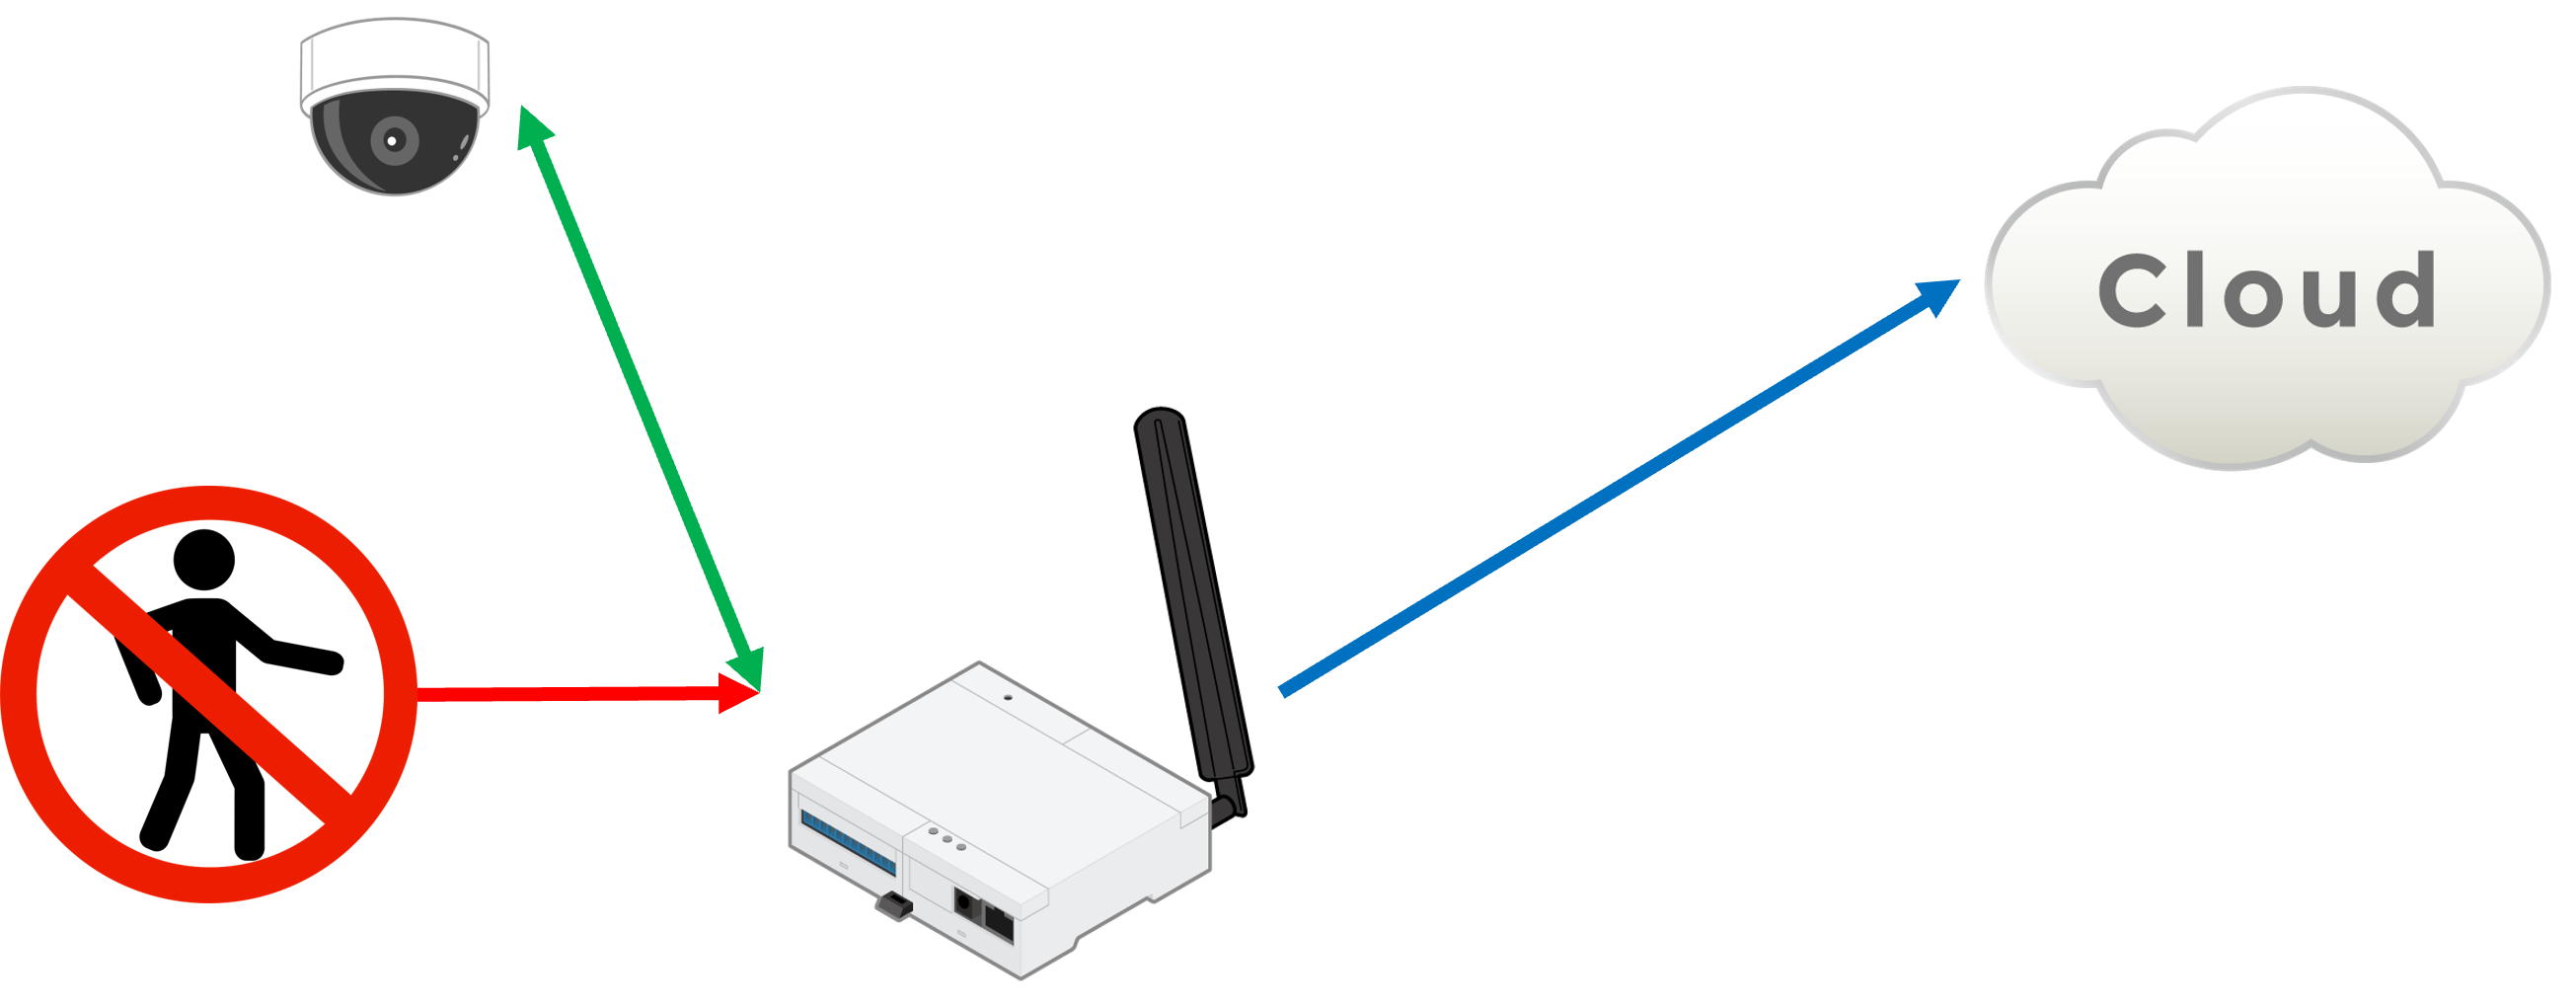
人感センサなどと組み合わせて必要なタイミングのみ画像撮影を行い、
撮影した画像をサーバに送信するという用途を想定したものです。
平常時は電力消費を抑えたSleep状態で待機し、
人感センサなどから接点信号の入力を受けて、
10分間カメラによって撮影した画像をクラウドサーバへ送信し、
再度Sleep状態に戻るという動作を取ります。
また、10分経過
接点入力を受けると、システムを起動してアプリケーションコンテナを立ち上げます。
コンテナが立ち上がるとアプリケーションが動作します。
30秒毎にUSBカメラで撮影、画像をAWSへ送信しカウントアップを行います。
カウントアップが10になったら処理を終了し、コンテナを停止します。
アプリケーション動作中接点入力状態を確認し、接点がONになっていたらカウントアップを0に戻します。
コンテナ起動から1時間以上コンテナが動作していたら、コンテナを強制終了させます。
アプリケーション開発の知見が無いユーザにもわかりやすいよう、今回はNode-REDを使ってアプリケーションを構築しました。
AWS設定
このサンプルアプリケーションではサーバサイドはAWSを使用します。
Amazon S3で画像を受け付けるためのバケットとアクセスするためのユーザを作成します。
具体的な手順は以下の記事などが参考なるかと思います。
Raspberry Pi内の画像をbase64でエンコードして→AWS IoT→S3に保存
最終的に作成されたAccess keyとSecret keyを保存しておきましょう
VSCodeを使ったコンテナアプリケーション構築
Node-REDアプリケーションを動作させるためのコンテナを作成します。
プロジェクト作成
ATDE上のVSCodeでコンテナ構築のためのプロジェクトを作成します。
以下を参考にCUIアプリケーションのプロジェクトを作成してください。
3.14. CUI アプリケーションの開発
作成したプロジェクト内の各ファイルを書き換えてコンテナを構築します。
Dockerfile
Dockerfileを以下のように修正し、Node-REDや依存アプリケーションがインストールされた状態のコンテナイメージを作成します。
「/root/Pictures」ディレクトリはusbcameraノードが撮影した画像を配置するのに必要なディレクトリです。
# ARCH will be set appropriately by scripts/build_container_image.sh
ARG ARCH
FROM docker.io/${ARCH}/debian:bullseye-slim
LABEL version="2.0.0"


# Add extra files you want to copy to 'resources' directory
# Note 'app' itself will not be part of the container, but
# used as a volume
# copying 'resources_${PRODUCT}' is optional and will not error if missing
# thanks to the [r] path glob. It is only intended for product quirks.
ARG PRODUCT
COPY resources [r]esources_${PRODUCT} /

# Add extra packages to containers/packages.txt
ARG PACKAGES
RUN apt-get update && apt-get upgrade -y \
    && apt-get install -y curl gcc g++ make libgpiod2 libgpiod-dev fswebcam \
    && update-ca-certificates --fresh \
    && curl -fsSL https://deb.nodesource.com/setup_lts.x | bash - \
    && curl -sL https://dl.yarnpkg.com/debian/pubkey.gpg | gpg --dearmor | tee /usr/share/keyrings/yarnkey.gpg >/dev/null \
    && echo "deb [signed-by=/usr/share/keyrings/yarnkey.gpg] https://dl.yarnpkg.com/debian stable main" | tee /etc/apt/sources.list.d/yarn.list \
    && apt-get update && apt-get install -y nodejs yarn \
    && npm install -g --unsafe-perm node-red \
    && npm install -g --unsafe-perm node-red-contrib-exit \
    && npm install -g --unsafe-perm node-red-contrib-image-output \
    && npm install -g --unsafe-perm node-red-contrib-libgpiod \
    && npm install -g --unsafe-perm node-red-contrib-s3 \
    && npm install -g --unsefe-perm node-red-contrib-usbcamera \
    && apt-get clean && mkdir /root/Pictures

# Modify as necessary
RUN useradd -m -u 1000 atmark
app.conf
コンテナイメージからコンテナを作成させるためのconfファイルです。
Node-REDのフロー設定などが保存される「/root/.node-red」を
ホストOSの「/var/app/rollback/volumes/{{PROJECT}}」ディレクトリにマウントすることで、
フロー設定の保存を容易にしています。
またUSBカメラと接点入力インタフェースをマウントし、
ホストOSのポート番号1880をコンテナのポート番号1880へポートフォワーディングしています。
コンテナ起動時に「node-red」コマンドを実行させます。
set_image localhost/{{PROJECT}}:latest

# mount app sources and data:
# - /var/app/rollback/volumes can be rolled back on failed
# upgrades, suitable for application sources and assets.
# - /var/app/volumes is not copied on updates and more suitable
# for volatile data such as logs and databases.
add_volumes /var/app/rollback/volumes/{{PROJECT}}:/root/.node-red
add_volumes /var/app/volumes/{{PROJECT}}:/vol_data

add_devices /dev/video*
add_devices /dev/gpiochip5
add_ports 1880:1880
set_command node-red

# Allow LED to be written. This is application specific
# and should be changed depending on your needs.
add_volumes /sys:/sys

# Allow input to containers and see output from containers
add_args -it

# Add environment variables set by Atmark Techno.
add_armadillo_env

# launch app
#set_command bash /vol_app/src/main.sh
flows.json
フロー設定のサンプルになります。このフローを読み込んで、AWSの認証情報を入力すればすぐに使用可能です。
VSCodeプロジェクトディレクトリの中の「app」の直下に置き、
ABOSDE Explorlerのメニュー「App run on Armadillo」を実行するとArmadillo上の「/var/app/rollback/volumes/[プロジェクト名]」ディレクトリに配置されて、
このフロー通りにArmadilloが動作します。
ただし、一度フロー編集画面を開き、「amazon s3 put」ノードを編集して、
Access keyとSecret keyを入力・保存しておく必要があります。
[
    {
        "id": "79051c6e0ca70e0e",
        "type": "tab",
        "label": "フロー 1",
        "disabled": false,
        "info": "",
        "env": []
    },
    {
        "id": "bb1464307d64f28f",
        "type": "aws-config-s3"
    },
    {
        "id": "af6f5a741ffdca7e",
        "type": "usbcamera",
        "z": "79051c6e0ca70e0e",
        "filemode": "0",
        "filename": "image01.jpg",
        "filedefpath": "1",
        "filepath": "",
        "fileformat": "jpeg",
        "resolution": "4",
        "name": "",
        "x": 290,
        "y": 60,
        "wires": [
            [
                "063665f8d765a797",
                "580cfad3efccbe5a"
            ]
        ]
    },
    {
        "id": "2ac3859c1afc3a85",
        "type": "inject",
        "z": "79051c6e0ca70e0e",
        "name": "",
        "props": [
            {
                "p": "payload"
            },
            {
                "p": "topic",
                "vt": "str"
            },
            {
                "p": "counter",
                "v": "",
                "vt": "num"
            }
        ],
        "repeat": "30",
        "crontab": "",
        "once": true,
        "onceDelay": "5",
        "topic": "",
        "payload": "",
        "payloadType": "date",
        "x": 90,
        "y": 60,
        "wires": [
            [
                "af6f5a741ffdca7e"
            ]
        ]
    },
    {
        "id": "063665f8d765a797",
        "type": "image",
        "z": "79051c6e0ca70e0e",
        "name": "",
        "width": 160,
        "data": "payload",
        "dataType": "msg",
        "thumbnail": false,
        "active": true,
        "pass": false,
        "outputs": 0,
        "x": 500,
        "y": 160,
        "wires": []
    },
    {
        "id": "8f49c7bb9ef6969f",
        "type": "switch",
        "z": "79051c6e0ca70e0e",
        "name": "",
        "property": "counter",
        "propertyType": "global",
        "rules": [
            {
                "t": "gte",
                "v": "12",
                "vt": "str"
            }
        ],
        "checkall": "true",
        "repair": false,
        "outputs": 1,
        "x": 750,
        "y": 180,
        "wires": [
            [
                "665c0068813770a0"
            ]
        ]
    },
    {
        "id": "baa389678342a075",
        "type": "debug",
        "z": "79051c6e0ca70e0e",
        "name": "debug 1",
        "active": true,
        "tosidebar": true,
        "console": false,
        "tostatus": false,
        "complete": "counter",
        "targetType": "msg",
        "statusVal": "",
        "statusType": "auto",
        "x": 840,
        "y": 60,
        "wires": []
    },
    {
        "id": "665c0068813770a0",
        "type": "exit",
        "z": "79051c6e0ca70e0e",
        "name": "",
        "exitcode": "0",
        "x": 890,
        "y": 180,
        "wires": []
    },
    {
        "id": "bdd348ce99f66826",
        "type": "function",
        "z": "79051c6e0ca70e0e",
        "name": "function 1",
        "func": "var tmp=global.get(\"counter\");\ntmp++;\nmsg.counter=global.get(\"counter\");\nglobal.set(\"counter\",tmp);\nreturn msg;",
        "outputs": 1,
        "noerr": 0,
        "initialize": "// ここに記述したコードは、ノードをデプロイした時に\n// 一度だけ実行されます。\nglobal.set(\"counter\",0)",
        "finalize": "",
        "libs": [],
        "x": 660,
        "y": 60,
        "wires": [
            [
                "8f49c7bb9ef6969f",
                "baa389678342a075"
            ]
        ]
    },
    {
        "id": "53b1b6259320c87f",
        "type": "gpio-in",
        "z": "79051c6e0ca70e0e",
        "name": "",
        "state": "INPUT",
        "device": "gpiochip5",
        "pin": "0",
        "x": 300,
        "y": 360,
        "wires": [
            [
                "e25dc37127dd09fa"
            ]
        ]
    },
    {
        "id": "126964660e2174ce",
        "type": "inject",
        "z": "79051c6e0ca70e0e",
        "name": "",
        "props": [
            {
                "p": "payload"
            },
            {
                "p": "topic",
                "vt": "str"
            }
        ],
        "repeat": "1",
        "crontab": "",
        "once": true,
        "onceDelay": 0.1,
        "topic": "",
        "payload": "",
        "payloadType": "date",
        "x": 90,
        "y": 360,
        "wires": [
            [
                "53b1b6259320c87f"
            ]
        ]
    },
    {
        "id": "e25dc37127dd09fa",
        "type": "function",
        "z": "79051c6e0ca70e0e",
        "name": "function 2",
        "func": "if(msg.payload==0)\n{\n    global.set(\"counter\",0);\n}\nreturn msg;",
        "outputs": 1,
        "noerr": 0,
        "initialize": "",
        "finalize": "",
        "libs": [],
        "x": 460,
        "y": 360,
        "wires": [
            []
        ]
    },
    {
        "id": "51bcdef32dab0af3",
        "type": "delay",
        "z": "79051c6e0ca70e0e",
        "name": "",
        "pauseType": "delay",
        "timeout": "1",
        "timeoutUnits": "hours",
        "rate": "1",
        "nbRateUnits": "1",
        "rateUnits": "second",
        "randomFirst": "1",
        "randomLast": "5",
        "randomUnits": "seconds",
        "drop": false,
        "allowrate": false,
        "outputs": 1,
        "x": 740,
        "y": 440,
        "wires": [
            [
                "665c0068813770a0"
            ]
        ]
    },
    {
        "id": "d9c305e296e08568",
        "type": "inject",
        "z": "79051c6e0ca70e0e",
        "name": "",
        "props": [
            {
                "p": "payload"
            },
            {
                "p": "topic",
                "vt": "str"
            }
        ],
        "repeat": "",
        "crontab": "",
        "once": true,
        "onceDelay": 0.1,
        "topic": "",
        "payload": "",
        "payloadType": "date",
        "x": 80,
        "y": 440,
        "wires": [
            [
                "51bcdef32dab0af3"
            ]
        ]
    },
    {
        "id": "580cfad3efccbe5a",
        "type": "amazon s3 put",
        "z": "79051c6e0ca70e0e",
        "aws": "bb1464307d64f28f",
        "bucket": "usbcameratest",
        "filename": "image.jpg",
        "localFilename": "",
        "contentType": "image/jpeg",
        "contentEncoding": "",
        "region": "us-east-1",
        "isBase64": false,
        "name": "",
        "acl": "",
        "outputs": 1,
        "x": 490,
        "y": 60,
        "wires": [
            [
                "bdd348ce99f66826"
            ]
        ]
    }
]
以上でコンテナを構築、Armadillo-IoT A6Eへ書き込むと、省電力カメラシステムが動作します。
実際に構築したものの動作はまた別途公開します。