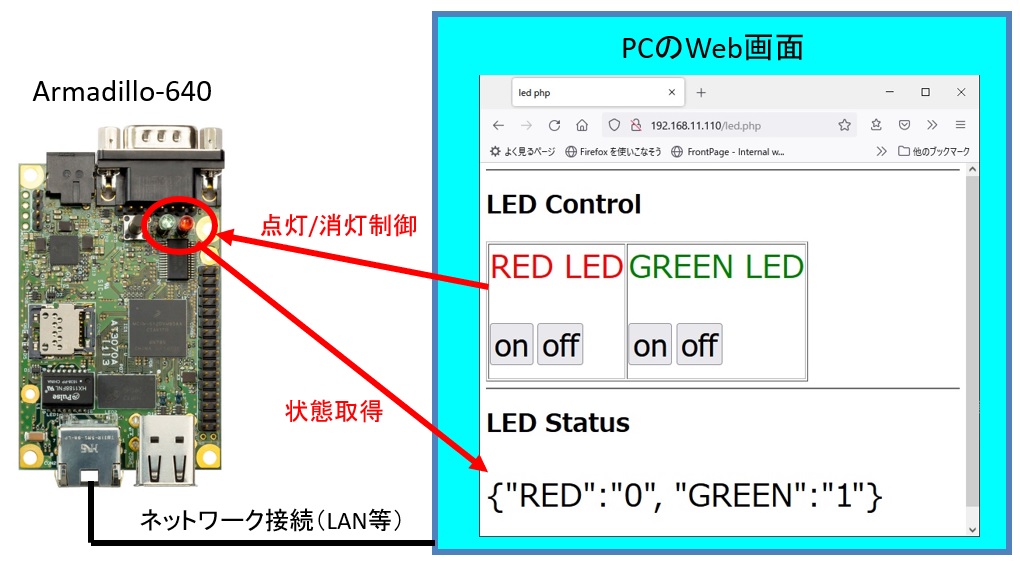
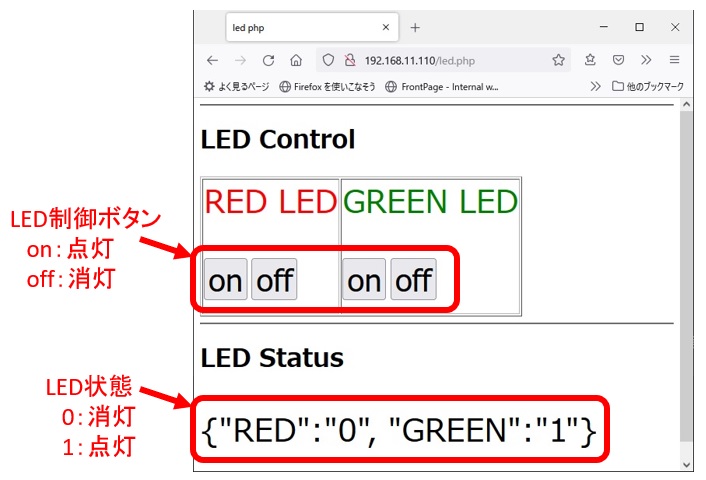
Armadillo-640/IoT(A6)をネットワーク経由で、Webブラウザの画面から制御する方法です。
ここでは、lighttpd+php-cgiを使用します。
例として、WebブラウザからArmadillo-640/IoT(A6)の赤/緑LEDを制御します。

1. lighttpd、php-cgiのインストール
Armadillo-640/IoT(A6)をインターネットに接続可能なネットワークに接続します。
下記のコマンドを実行して、必要なパッケージをインストールします。
root@armadillo:~# apt-get update
root@armadillo:~# apt-get install lighttpd
root@armadillo:~# apt-get install php-cgi
2. lighttpdにphp-cgiを設定
lighttpdでphp-cgiの設定を行います。
設定ファイルは /etc/lighttpd/lighttpd.conf です。
/etc/lighttpd/lighttpd.confの設定箇所
server.modules = (
        "mod_indexfile",
        "mod_access",
        "mod_alias",
        "mod_redirect",
        "mod_fastcgi",  # この行を追加
)

# ファイルの末尾に
# 以下の行から
fastcgi.server = ( ".php" =>
    ( "localhost" =>
        (
            "socket" => "/tmp/php-fastcgi.socket",
            "bin-path" => "/usr/bin/php-cgi",
        )
    )
)
# 以上の行までを追加。
設定ファイルを書き換えた後、Webサーバー(lighttpd)を再起動します。
root@armadillo:~# systemctl restart lighttpd
3. PHPでLEDを制御するプログラムを記述
下記の内容で/var/www/html/led.phpファイルを作成します。
/var/www/html/led.php
<html>
<head>
<meta http-equiv="Content-Type" content="text/html; charset=UTF-8">
<title>led php</title>
</head>

<body>
<basefont size="5">

<hr>
<h1>LED Control</h1>

<?php
if(isset($_POST['red'])){
 $red = $_POST['red'];

 if($red == "on"){
  system("echo 1 > /sys/class/leds/red/brightness");
 }
 elseif($red == "off"){
  system("echo 0 > /sys/class/leds/red/brightness");
 }
}

if(isset($_POST['green'])){
 $green = $_POST['green'];

 if($green == "on"){
  system("echo 1 > /sys/class/leds/green/brightness");
 }
 elseif($green == "off"){
  system("echo 0 > /sys/class/leds/green/brightness");
 }
}
?>

<table border=1><tr><td>
 <p style="font-size:30pt;color:red">RED LED</p>
 <form action="led.php" method="post">
 <input type="submit" name="red" value="on" style="font-size:30pt">
 <input type="submit" name="red" value="off" style="font-size:30pt">
 </form>
</td>
<td>
 <p style="font-size:30pt;color:green">GREEN LED</p>
 <form action="led.php" method="post">
 <input type="submit" name="green" value="on" style="font-size:30pt">
 <input type="submit" name="green" value="off" style="font-size:30pt">
 </form>
</td></tr></table>

<hr>
<h1>LED Status</h1>

<?php
 $red_status = null;
 $green_status = null;
 $retval = null;

 exec("cat /sys/class/leds/red/brightness", $red_status, $retval);
 exec("cat /sys/class/leds/green/brightness", $green_status, $retval);

 $string = "{\"RED\":\"".$red_status[0]."\", \"GREEN\":\"".$green_status[0]."\"}\n";

 file_put_contents("/var/www/html/led_status.txt", $string);
?>

<p style="font-size:30pt">
<?php
 include "led_status.txt";
?>
</p>
</body>
補足)
赤/緑LEDの制御は、
/sys/class/leds/[red|green]/brightness
に"0"/"1"を書き込むことで、消灯/点灯を行います。
赤/緑LEDの状態は、
/sys/class/leds/[red|green]/brightness
の値を読み出して、JSON形式にして、
/var/www/html/led_status.txt
というファイルに出力し、このファイルの内容を表示します。
4. ファイルの権限の変更
上述の/sys/class/leds/[red|green]/brightness、/var/www/html/led_status.txtを
ネットワーク経由でアクセスしたユーザーからも読み書きできるように権限を変更します。
root@armadillo:~# chmod 666 /sys/class/leds/red/brightness
root@armadillo:~# chmod 666 /sys/class/leds/green/brightness

# /var/www/html/led_status.txtは、新規作成します。
root@armadillo:~# touch /var/www/html/led_status.txt
root@armadillo:~# chmod 666 /var/www/html/led_status.txt
5. 動作確認
Armadillo-640/IoT(A6)とネットワーク接続されたPCのWebブラウザで、下記のようにアクセスします。
http://[ArmadilloのIPアドレス]/led.php
Webブラウザに表示された画面で、Armadillo-640/IoT(A6)の赤/緑LEDを制御できます。

補足)curlコマンドによる制御
Webブラウザの画面を使わずに、curlコマンドで制御することも可能です。
赤LEDを点灯するコマンド例
curl http://[ArmadilloのIPアドレス]/led.php -X POST -d "red=on" -sS -o /dev/null
緑LEDを消灯するコマンド例
curl http://[ArmadilloのIPアドレス]/led.php -X POST -d "green=off" -sS -o /dev/null
赤/緑LEDの状態(led_status.txtの内容)を取得するコマンド例
curl http://[ArmadilloのIPアドレス]/led_status.txt
# 実行結果
{"RED":"1", "GREEN":"0"}